How to enable DVD playback in Ubuntu 12.10


Install fresh Ubuntu 12.10, many users have
experienced one of the most popular issues-how to play the DVD in Ubuntu. It is this question that we now turn.

So, to play a DVD, we need only one package-libdvdread4. Include it in the distribution Canonical can not because of possible problems with the license.

You can install the package using the Software Center Ubuntu (he's named as the Library for reading DVDs), or the old fashioned way-with the help of the terminal:

sudo apt-get install libdvdread4

After installing the package libdvdread4 you need to run a custom script is integrated into it. For this to terminate the following command:

sudo/usr/share/doc/libdvdread4/
install-css.sh


The script runs its course in a matter of seconds.

Then you can easily view any multimedia DVD in your favorite player.


Setting the icons from Ubuntu 13.04


For a long time Canonical promises new icons in Ubuntu, the first revelation hints at it appeared a year ago. And finally is the result, you can use the most. A set of icons My-humanity, which contains some new icons Ubuntu.

By My-humanity pack with icons Ubuntu 13.04-Magog64. Pack can download it here: gnome-look.org.

No system requirements (of course), the icons can be installed on any version of Ubuntu.
If you decide to install the pack My-humanity and have already downloaded it, there are very few. Just unzip the resulting archive to ~ /. Icons (if this folder does not exist-create), and then with your favorite tweaker activate the pack icons My-humanity.

I note that there is not all the icons from Ubuntu 13.04, many of them the author invented himself.


Internet Explorer 10, how to disable the icon "show password"


The version of Internet Explorer 10 included in Windows 8 includes an option that, through the touch of an 'eye' icon, it shows clear passwords that you enter on Web sites The risk to privacy is enough remote but present, we see how to get rid and prevent malicious dell'occhietto who incidentally passes to our PC can see the password that you entered.


To disable the icon "show password" in Internet Explorer 10 you need to go in the 'Local Group Policy Editor. To do this, you must press the key combination Win+R to bring up the box "Run" and give the command gpedit.msc. To underline the fact that the Local Group Policy Editor is only available in Windows 8 Pro and above, not on Windows 8 "standard."

At this point, you have to use the side navigation bar to reach the following path: User Configuration>Administrative Templates> Windows Components>User Interface credentials and double click on the key do not see the button to reveal the password.

Finally, put the check Enabled, click Apply and OK and the eye icon will be disabled. To verify that they are stored the settings, restart Internet Explorer and try to login to any website In case you change your mind, to regain the ability to display the password you type in gpedit.msc just go back online, double-click on the key to display the button to reveal the password and put the check to Not Configured.

Note that applying the change to the User
Configuration setting affects only the user account used to extend the icon to disable all system users must use the Computer Configuration.


QuieTube, watch YouTube videos without distractions


If your dream is to be able to see the YouTube videos without distractions, QuieTube is the application you've been waiting.

QuieTube is a site that allows you to "delete" all that is around a YouTube video, and movies suggested, banners and user comments. Thanks to QuieTube we can eliminate all
unnecessary elements and unwelcome to a page and view the video in a nice white screen, without publicity, without comment (ultile for those who want to see a show without spoilers, for example), and without the side column with recommended videos.

Extremely easy to use, all you need to do is copy the URL of the video in the white box shows the home page of QuieTube and you're done. QuieTube is available as a Google Chrome app for free download from the Chrome Store.


Start Menu Modifier, have the Start screen on the Desktop in Windows 8


Of programs for Windows 8 Start Screen dedicated to the new Microsoft operating system they are coming galore, some very interesting, others less so. Start Menu Modifier that allows you to connect desktop and Start screen of Windows 8 in a nice and original. Using Start Menu Modifier you get a sort of split screen in above or below the Desktop of Windows 8 (depending on your preferences) you can display the Start Screen with all its live tiles. In this way, it becomes possible to start programs, search for files
and do other things in the Start screen without leaving the Desktop.

A solution "intermediate" which we believe is perfect for those who are still loyal to the Start menu in Windows 7 but they are doing
everything possible to settle the interface Metro.

The application takes in effect replaces the Start Screen in full screen and you can recall not only through the hot corner in the bottom left but also by Chamrs Bar and customizable keyboard shortcuts.

You can set all the main program window, which should be performed with administrator privileges ignoring the advice of the SmartScreen Filter. In short, all you need to do to get this Start Screen in half Desktop Windows 8 launch Start Menu Modifier, choose to have the bar with the Start screen up or down using the appropriate drop-down
list and click the OK button. There is also the option to start the program automatically when Windows starts and boxes to set keyboard shortcuts, as I mentioned before.

If you are interested in the program, the download link is below. Of course, all free and no-install. We we tested it successfully on Windows 8 RTM 64-bit.

DOWNLOAD | Start Menu Modifier


Weavly, create videos from your browser using the contents of Youtube and SoundCloud


The good old Windows Movie Maker is always useful to make the video. If you plan to use the program to create a mix of movies, you surely know that we must own the content on your computer. A little 'uncomfortable, right? Now the web is sovereign and, therefore, the on-line applications have their roots in any industry, even in the creation of video.

This morning we present an amazing free web
application, Weavly. The service offers you the ability to create video composed of multiple pieces of footage taken from Youtube where you can add a soundtrack , and even text. It will be a real Movie Maker, which only lets you take pieces of video directly from those on the portal of Google.

Once you reach the main page Weavly, select the button "Create a new Mix" and you are ready to begin the creation of your personal video. At the top right you will find the button "Tutorial" to understand the operation of the application, although it is really
quite simple.

From the Timeline below, you will select the "+" symbol yellow to add a video or music content. In the first case, you will get a section (at the top) you will find a video from Youtube: just paste the link of the movie in the search bar (located on the top) and then you will have to drag it to the Timeline.

In addition, you can also drag the button "title" to enter text in the video (setting font, color, background and position) and the "Pause" button to enter a pause.

As we have already said, you can also enter the music: the procedure shall be the same as the video, but we will need to exploit SoundCloud instead of Youtube. At the end of creation, you can press the "Play" button to watch the video, but to save it we will need
to make a quick recording using your Facebook account or Twitter. Do not miss the opportunity to share your movie on social networking sites.
Weavly


Change the color and thickness of the window frame in Windows 8


Not everyone likes the standard color scheme of Windows. Fortunately, the system allows you to easily change the color of the window, and does in automatic mode, selecting the predominant colors wallpaper. We look at ways to change the color of the window in Windows 8, and explain how to change the thickness
of the window frame.


Color

Automatic change with wallpaper
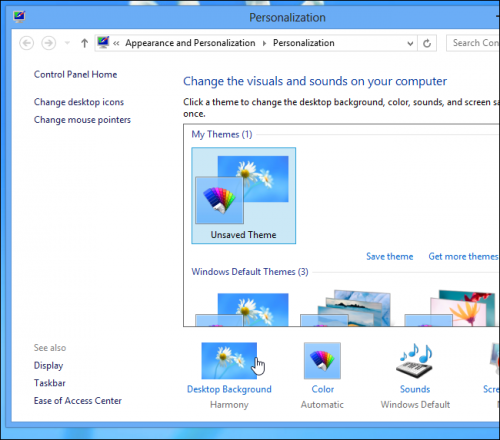
Blue color of the window, which is set to Windows 8 by default, is actually a result of the fact that this color predominates in the default wallpaper. You can change the wallpaper in the same way as we did in Windows 7, or right-click on the desktop and select the context menu Personalize.


At the bottom section, select Desktop Background and install either one of the preset options, or wallpaper from your own collection.


Windows will automatically choose the dominant (in her opinion) as a color tint windows, however, in the case of a colorful picture results can be unpredictable.

Hands

That is why sometimes it is easier to change the color manually. Click on the section to the right of Color Desktop Background. Here you can select one of the preset colors, set the flow rate and other parameters.


Other utilities

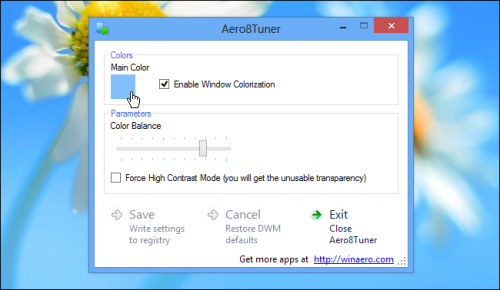
If you mess around with the sliders in the menu system does not really want, you can install the free utility Aero8Tuner, with which you can create and save color schemes, and quickly switch between them.

The thickness of the frame


Register

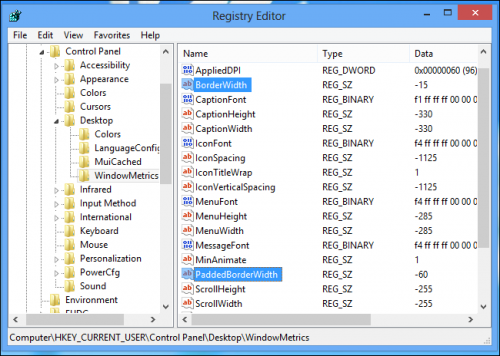
Familiar commands run regedit Windows registry and go on this way:
HKEY_CURRENT_USER\ControlPanel\Desktop\Windowmetrics
Here we are interested in two parameters-BorderWidth and PaddedBorderWidth. By default, correspondthese values ​​ to the -15 and -60.


ofTo make the frame as small, change the values ​​these two parameters to 0. Changes to take effect, you must log onto the system.


Other utilities

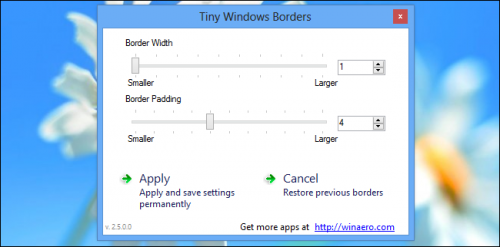
If you go into the registry does not want it, you can download the free utility Tiny Window Borders. This application does not require installation and can adjust the thickness of the frame with the help of two sliders.


In this case, the changes will take effect
immediately after you click Apply.

Please click ads:


GUIDE FIVE THINGS MORE CUMBERSOME IN WINDOWS 8


System for desktop computers to bring a little
'innovation and revitalize the IT market sinking deeper into crisis. Many complain, however, the usability of this new interface, lacking specific experience with classical computers. And it is precisely this aspect that we're going to occupy today, we will look at five things that are less intuitive in the new version of Windows 8 just released on October 26, obviously having a computer
without a display touch since many new laptops do not possess new and of course it would be uncomfortable to use on a desktop.

WINDOWS 8 INTRODUCES A NUMBER OF
INNOVATIONS THAT CAN MAKE IT MORE
SIMPLE, FAST AND STRAIGHTFORWARD, BUT NOT ALWAYS. HERE ARE FIVE THINGS LESS INTUITIVE.

1. TO DISPLAY THE TABS (TABS) IN INTERNET EXPLORER 10
Windows 8 comes with a new version of Internet Explorer, or the 10 that promises to increase the performance and particularly introducing the full-screen mode in Windows 8 UI. In Internet those of you who do not open multiple pages Simultaneous and if you have a touch screen you will be quite uncomfortable simulate a "swipe" from the top down to show the tabs. Here's a quick shortcut to overcome the problem: just press the key Windows + Z.

Tab of Internet Explorer in Windows 8


2. CHANGE "TAB" BROWSER
As before, the Browser is one of the applications that we use most frequently of our operating systems, with Windows 8 and if you do not want to complicate your life to simulate crazy gesture with the mouse, the shortcut CTRL + TAB will help you to change faster the card you are viewing without
them first appear on the screen.


3. CLOSE THE APP WINDOWS 8 UI
With the new Start Screen and applications Windows 8 UI will definitely do this question "But as I close this app?". There is the usual red "X" in this case and in the tablet, or touch panel devices with just drag, literally, the application from top to bottom.
With mouse and keyboard it gets more complicated but Microsoft will "help" thus making the cursor a little hand flat that simulates the act. Microsoft, however, says that leaving them open does not reduce performance, as the app is suspended a few
seconds after they are put in the background, not consuming CPU cycles and freeing up RAM when needed (thanks to Marco for pointing this out).

Metro applications, as I close?


4 -WHAT PROGRAMS ARE RUNNING?
As for the applications that run on the desktop have the same old task bar and convenient for applications in Windows 8 UI there is a bar or a container where visible at all times keep an eye open applications, you
need to call this bar with a light swipe from left to right. The shortcut Alt + Tab will likely be a lot faster. Alternatively bringing the mouse in the upper left we can move to the last app open and with a swipe down on the left edge view all open app.

The new task bar of Windows 8 UI


5. AT WHAT POINT IS THE BATTERY?
Surely if you have a tablet or a laptop you know that sometimes you have to check the battery life, and even though this is another improvement of Windows 8, the autonomy will never be infinite. The small icon next to the time the battery will always be present but only in desktop mode, if you're in the Start
screen or in an app, you should go to the bar Charms, after which you will see a popup in the bottom of the screen to the left with the time, date and other information including the battery. This bar is called by another swipe, this time from right to left, but for those who do not like to recommend the use of
these methods the shortcut Windows + D.

How to display battery status on Windows 8 UI

These were just some of the shortcuts that can save lives (we speak of having almost hidden the off button?) Unless you have a computer with touch, something that many should be without on your regular computer, but with many touchpad multi-touch gesture to make the screen can be made even​​ on itself.


HOW TO RESTORE THE START BUTTON ON WINDOWS 8


Until now many have sprung up on the web software that imitate or simulate a new menu is similar in functionality to the old Start, but recently it was discovered that Microsoft has not removed entirely from explorer menu, but hid it to make room novelty.

Remove it would require a rewrite more complicated and lengthier the famous explorer.exe. Then we go to see how to reactivate already nostalgic for menu
shortcuts also in the new version presented today 's most popular operating system in the world and sold

  • First of all Equip this zip file at this link;
  • Go into your hard drive to install windows (it is marked by its logo and is usually C:\) and create a folder named StartIsBack;
  • Remove the newly created folder the contents of the zip file you downloaded to the first point;
  • Depending on the version of the system installed run the appropriate installation file, so I NSTALL_X86 if you have Windows 8 32-Bit or INSTALL_X64 if you have the 64-bit;
  • Restart the computer to apply the changes ... ;
  • You can remove it at any time by launching the executable named UNINSTALL.

The result is the real Start menu that owners of Windows 7/Vista know, for the most is a chance that Microsoft will not remove unless new versions (Windows 9).


Google AdWords will show keyword "start" advertising


A new feature introduced in Google AdWords, advertisers will know exactly what the keyword "Run" display advertising. Prior special Google ads do not, but maybe an official post in the near future there will be a blog AdWords.

In the column, you can see the added user-entered keyword that led to the show of an announcement. Ie thanks to a new feature, you can identify effective keywords, and adjust the list of keywords for which buys advertising in the search engine Google.

This column is as follows:


To add a new feature in the reports need to go to the desired tab advertising company, then the tab «Keywords» select the option "All". Columns pop-up menu to find a link to "customize columns". Next, choose the "attributes" for "metrics" and add a "keyword."


Searches that led to transitions to issue
advertisements in Google, will appear in the search query report AdWords (Search Query Report).

Purpose of the report is that it allows advertisers to find people search sites, and based on these data, add new keywords, freeze display some ads found ineffective keywords. Now you can learn relevant user queries that keyword, which led to the display of advertising.


Includes work NotifyOSD on the active monitor when working with multiple monitors


I recently purchased just two posh monitor, so there was a question about the optimization of Ubuntu with multiple monitors. The first problem I encountered-Display NotifyOSD.

All pop-up messages to appear on the primary monitor, which was not very convenient,
because focus on two monitors at once was difficult.

Problem Solving - NotifyOSD display on the active monitor (on the whereabouts of the active, at this time, the window).

So, first need to install dconf-tools:
sudo apt-get install dconf-tools

Then run dconf-editor, navigate to apps -> notifyosd and change "multihead-mode" to "dont-focus-follow" to "focus-follow".

That's it, now pop up a notification will be displayed on the monitor, which is active at the moment.


How to add / remove a user via a terminal in Ubuntu


Of this manual you will learn how to add / delete users in Ubuntu Linux. Also, I will explain how to add a user to "sudo", but be careful, because the users of this group can execute commands with root
privileges.

How to add a user

So, to add a new user in Ubuntu, use the following command:

sudo user add username

Instead of "username" enter the name of the new user.

Create a home directory for the new user:
sudo mkdir /home/username

Now create a password for the new user:
sudo passwd username

Set the correct permissions on the home folder ofthe new user:
sudo chow nusername /home/username sudo chgrp username /home/username

All, you can now use the system from under the new user.

Issuing the root-user rights

If you need to give root-rights to the new user, then use this command:
sudo adduser username sudo

How to delete a user

To delete a user, use the following two commands:
sudo userdel username sudo rm-r/home/username/

This will remove the user from the system, as well as his home folder.

This manual is suitable for any version of Ubuntu, Linux Mint, as well as almost any other distribution.


Complete list of "hot keys» Windows 8


Windows 8 is not all to the taste, though, Microsoft's aggressive policy in the promotion of the new operating system always results enslave the world she desired result.

We have to get used to ... In the blog, the Windows 8 appeared a valuable list of "hot keys" , which are, apparently, all imaginable and not imaginable operation.

The liberty to copy, because many useful:
Win - Switching between the start screen and the latter is running

Win + C - Calling the right pop-up panel (at the same time shows the current time)

Win + I - call options panel

Win + H - Calling the panel "Sharing"

Win + K - Calling the panel "Devices"

Win + Q - Access to search by application

Win + F - Access to the file search

Win + W - Access to search by Default

Win + P - Configure a second monitor

Win + Z - Call for applications toolbar vin8

Win + X - Call the menu system utilities

Win + O - Lock screen orientation

Win +. (Dot) - Add application to the right

Win + Shift +. (Dot) - Add application on the left

Win + V - Show all active notifications

Win + Shift + V - Show all active notifications in reverse

Win + PrtScn - Make a screenshot of the screen and automatically save it in the folder "Screenshots
"
Win + Enter - Start Narrator

Win + E - Open the folder "My Computer"

Win + R - Open the dialog "Run"

Win + U - Open Ease of Access Center

Win + Ctrl + F - Open the dialog "Find Computers"

Win + Pause / Break - Open page "System"

Win + 1..10 - Run, enshrined in the taskbar at the appropriate place

Win + Shift + 1..10 - Starts a new instance of the program laid down in the taskbar at the appropriate place

Win + Ctrl + 1..10 - Call the last active window of the program laid down in the taskbar at the appropriate place..


Win + Alt + 1..10 - Calling the navigation menu of the program laid down in the taskbar in place

Win + B - Select the first icon in the system tray.

Go to the next icon is done by hand. Pressing the «Enter» - its opening Win + Ctrl + B - Calling the program, showing a notification in the system tray

Win + T - Toggle between elements of the taskbar

Win + M - Minimize all windows

Win + Shift + M - Restore the minimized windows

Win + D - Show / Hide Desktop

Win + L - Lock computer

Win + Up Arrow - Expand the current window

Win + Down Arrow - Maximize / Restore the current window

Win + Home - Minimize all but the current window

Win + Left Arrow - Fix the window to the left of the screen

Win + Right Arrow - Fix the window on the right side

Win + Shift + Up Arrow - Increase the window from the top to the bottom of the screen

Win + Shift + Left / Right Arrow - Send window to another monitor

Win + F1 - Run Windows Help


PageUp - Scroll the "Start" forward

PageDown: Scroll the "Start" back

Ctrl + Esc - Switching from home screen to the last active application

Ctrl + Mouse wheel - look at the startup screen "above"


Alt - Show hidden menu applications

Alt + D - Select the address bar

Alt + P - Show preview pane in Windows Explorer

Alt + Tab - Toggle forward between open windows

Alt + Shift + Tab - Switch back and forth between open windows

Alt + F - Close the current window. Open shutdown dialog from the desktop

Alt + Spacebar - menu for the current window

Alt + Esc - Switch between running programs in order of their start

Alt + Enter - Open the properties of the selected element

Alt + PrtScn - take a screenshot of the active window and place it on the clipboard

Alt + Up Arrow - Up one level in the Explorer

Alt + Left Arrow - Go to the previous folder

Alt + Right Arrow - Go to the following folder

Shift + Delete - Delete an item passing Cart

Shift + F6 - Toggle back between controls in a window or dialog

Shift + F10 - Call the popup menu for the selected item

Shift + Tab - Switch back and forth between the elements in a window or dialog

Shift + click - the group of selected sequences

Shift + click on the taskbar button - Start a new copy of the program

Shift + Right-click on the taskbar button - Call the context menu item

Ctrl + A - Select all items

Ctrl + C - Copy selected items

Ctrl + X - Cut selected items

Ctrl + V - Paste the selected items

Ctrl + D - Delete selected items

Ctrl + Z - Undo

Ctrl + Y - Redo action

Ctrl + N - Open a new window in the Explorer

Ctrl + W - Close the current window in the Explorer

Ctrl + E - Choose the search bar in Explorer

Ctrl + Shift + N - Create a new folder

Ctrl + Shift + Esc - Open Task Manager

Ctrl + Alt + Tab - Open panel to switch
between windows

Ctrl + Alt + Delete - Access to the lock screen

Ctrl + click - Select multiple individual items

Ctrl + click and drag an item - Copy item in the same folder

Ctrl + Shift + click and drag an item - Create a shortcut item in the same folder

Ctrl + Tab - Toggle forward between tabs

Ctrl + Shift + Tab - Switch between tabs back

Ctrl + Shift + click on the button in the task bar - Start a new copy of the program from the Administrator


F1 - Display Help

F2 - Rename the file

F3 - Open Search

F4 - Display drop-down list in the address bar of Windows Explorer

F5: Refresh the screen

F6 - Switch between the window or dialog

F7 - Display history of commands in the command line

F10 - Show hidden menu bar

F11 - Toggle full-screen mode

Tab - Toggle forward between the elements in a window or dialog

PrtScn - Take a screenshot of the entire screen and place it on the clipboard

Home - Jump up in the open window

End - Go down through the open window

Delete - Delete the selected item

Backspace - Go to the previous folder in Explorer. Move the cursor up one folder in the Open or Save dialog boxes.

Esc - close the dialog box


Num Lock Enabled + Plus (+) - Display the contents of the selected folder

Num Lock Enabled + Minus (-) - Close the selected folder

NumLock Enabled + asterisk (*) - Expand all
subfolders of the selected folder

Press the Shift five times - enable \ disable
StickyKeys


Seven Ways to Use Gmail Shortcut


Accessing email would be easier if we know the keyboard shortcuts. Fortunately, Gmail offers a keyborad shortcuts To help streamline the user's email activity.

Before testing these shortcuts, make sure you have
enabled the setting in Gmail keyboard shortcuts. How
to activate it, first select "Settings", then select
"General", then activate the Keyboard Shortcut.
Here are 7 shortcuts (shortcut) in Gmail;

1. Compose a message: create a message in Gmail
may be fairly easy to do in the normal way, but there
are other ways to do it. You can press Shift + C on
your keyboard to create a message in the window
(window) new.

2. Scroll (scroll) email: You can scroll messages in the inbox by pressing K and J. This can be done when
you want to access the new email and the old one.

3. Choosing Message: When accessing your email
inbox, you can press X to select one message.

4. Replying to a message and forward the message: When you open an email, press R to reply.
Meanwhile, to forward the message, you can press F
on the keyboard.

5. Save messages in draft: If you are writing a
message and all of a sudden want to keep it, then
press Ctrl + S. After that, it will automatically be
saved in the draft message.

6. Delete message: An easy way to delete a
message, just press the # sign. Then after that, the
message is immediately deleted.

7. Mark messages read or not to read: Once you
select a message, press Shift + I to mark as read,
and Shift + U as unread messages.


Tips Battery Saving on Android Phone


Having the ideal smartphone can now be obtained thanks to the presence of the Android operating system. Yes, the OS is based on open source is making almost all devices with a range of prices can be pinned to the OS, and labeled 'Smartphone'.


However, sometimes the problem is different from
the mobile smartphone features a vibrant with a
variety of applications. So that was not just a mobile
phone needs longer to communicate only with the call
or sms.

The number of downstream applications into Android
handheld devices, sometimes making this phone easy
weak. Excessive power consumption and 'wasteful'
make Android handset battery life.

Here are simple tips that batteries can last a long
time:

1. Turn off unused applications anymore.
This phone does have multitasking function, so users can run one application to another without having to turn off the previous application. On the one hand it's good, but the application is still running bad it also takes energy, although it is not used.

To do this, the user can do this manually by turning it
off one by one. However, you can also use apps like
'Advanced Task Killer' to turn off, or sorting
applications where you want to 'kill'.

In addition, there are other applications called 'dry
to Save Battery Battery'. It is much more complete,
because it also provides additional information which
applications are consuming energy.

2. Reduce the brightness of the screen,
You do not need great lighting resolution during the day or outside the room. So, the screen on your device can be reduced to conserve battery life.

The way is easy, go to 'settings' and then select'
display, after which users can adjust color and
contrast ratio kecerahaan.

3. Turn off live wallpaper,
Android phones are very cool when they appear with wallpapers that can move. However, unfortunately this is enough to drain the battery power for the handset. It's good enough to replace your regular walpaper, for mengemat battery.

4. Mobile network,
Computers in the hand is pinned to these Android phones, because of its ability to explore the virtual
world was amazing. But if you're not in a state online,
it helps the mobile network is turned off to save the
condition.

How, go to the settings menu and select Wireless and
network, then just select the mobile network, and
then select the function 'off'.

* Tips are used in the Android version 2.2 (Froyo) and
above.


Windows 8: alphabet gestures


1. One click on a tile to launch the necessary application.


2. Slide the left edge of the screen, you can "pull" the list of running processes.


3. To close a program, you need to swipe your finger from the top of the screen to the bottom.


4. Multi-touch display allows you to increase or decrease the items in browsers and mixing and dilution of the two fingers.


5. To call the settings panel the application should hold your finger on the bottom of the stairs.


6. Sliding gesture from the right edge of the screen opens the system tray of Windows 8 along with a button
"Start".


How To Backup user data to Android


This material is no claim to originality or novelty of the problem to be solved, but it can be extremely
useful for beginners and for those who like me, take
care of their data on devices running Android. Later
in the article, I set myself the task of ensuring a
reliable backup with cloud storage and resolve them.
Still interested?

Before we begin I will say that I do not belong to the
category of citizens who obsessively concerned about
privacy of their data. This does not mean that I have
a session on the operating system without
authorization, all around the open balls, standard
passwords on accounts or open wireless network at
home and at work. It only means that I do not encrypt
your files, email and use of public cloud storage
services and sleep strong and healthy sleep without
thinking that the employees or owners of the data
center services can, if they want to see my data.
Personally I believe that privacy, as such - is long
dead, but it is beyond the scope of this post.

But I hope as many of you care about the security of
the data from the backup. Dear% username% ask - so
what is there to Android? And here, on the Android
over the past few years, this OS densely settled in
my daily life, to fully drive from there iOS and WM.
In addition to this, in recent times, like mushrooms
after the rain, has developed many services provided,
as well as free of bank notes, a certain number of
gigabytes to "trusted" server somewhere out there
in the global network. I believe that these "reliable"
services - any safer my home PCs, flash drives and
disks, and even at times more convenient in terms of
accessibility. Sin did not take advantage of this
unprecedented generosity attraction.

In recent years I have accumulated a large amount of
different kinds of information, to lose that would be
extremely unpleasant. I'm talking primarily about the
photos of his children and wife, beloved cat pictures,
which is my projects at work, and all kinds of nice
stuff to sort of progress in the games.

I forced myself to do backups on their devices.
Compiled even that sort of schedule. Do it regularly
turned out with varying degrees of success, it is
commonplace to no time. As a result, the head ripened
thought about how this whole process automated.

And here's how it turned out to be off and I decided
to "prosherstit» Google Play for any application which
could help me to keep your data, get all set up.

And so, for the fact that I was calm, I want:
»» Backup schedule with a minimum and I played better without me. »» Backup to the cloud (preferably several) »» Replication of backup data on the hdd home desktop and laptop hdd (suddenly "the Germans would attack" and switch off the internet) and all the same without me »» Synchronization from anywhere where there is access to the Internet.

Perhaps it would have been enough for the first time.
As a result, the head formed a plan of action from
the picture below.


In Android as it has built redundancy mechanism, but
it does not work. More precisely - I was unable to
"prepare" so that he would have met the requirements described above. Contacts and all that is connected and Gmail normally reserved as expected, they do not touch.

Dropbox is mainly used for working and sharing
information with friends.

»» SkyDrive got a load from uchetka from outlook.com and new windows 8 is not used. Google Drive - native Android service store in the various documents of habit after Google Docs, like. »» BOX, with 50 gigabytes khaljavnogo until recently, is unused. »» There are still all kinds of Ubuntu One, Sugarsync and a couple of other less popular their counterparts who I considered purely for informational purposes.

On request «Data Sync» Google Play dumped on "me
car and small truck" of different quality applications,
which together with a "paradise on earth", and
promised me to ensure the safety of my data. What
it does it for the money, and what is completely free
of charge. What has not been updated for a long time,
others have had to say the least - spartan interface.
As a result, I bought a pair of full versions of the
applications and take their field trials.

I would not want to do a comparative review of these
applications. Let me just say that for their needs I
adapted the application with the speaker called
«FolderSync» (there are paid and free version).
Below are a few screenshots of the interface, as
they say, once a set and forget.
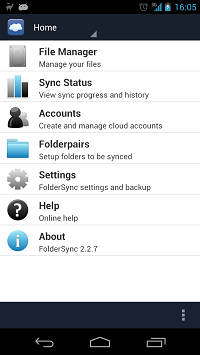
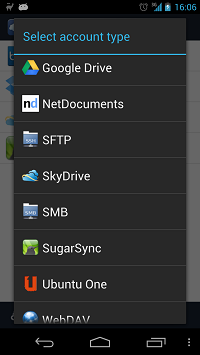
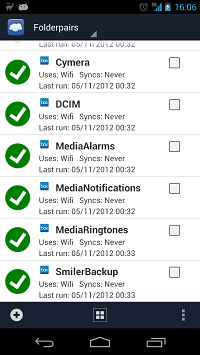


The logic of the application is based on the creation
of a pair of folders (Folderpairs), local and remote.
Local folder is any local folder on your device,
including, if necessary, sub-folders. Deleted folder,
as the name implies, it is a folder on one of the
service cloud storage or your ftp, smb or webdav
server. In the settings you can specify each
folderpairs synchronization direction, set a schedule
for how conflicts, rules for the use of wireless
networks and a lot of other options. The screenshots
below setting the very folderpair.
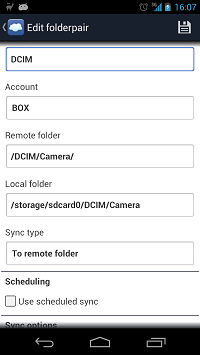
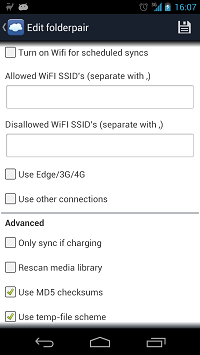


I do not particularly care about taking care of
reservation of installed applications, all of their data
or firmware (for me not see the point.) But the
problem is also easily solved by creating folderpair
for the folder in which to store your backups
TitaniumBackup (which, as it is able to inject himself
into the cloud, but not at all), or ROM Manager. By
the way, DataSync can backup and applications, if you have root.

I think that setting the list of synchronization is
conveniently done in DataSync Beta, though it is still
quite raw, but growing rapidly. In this version you can
specify multiple folders in a single list. Very
comfortable (there is a stable version of Data Sync,
but to me they do not come, Beta has a wider
functional'll watch her.)
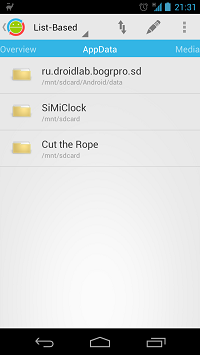
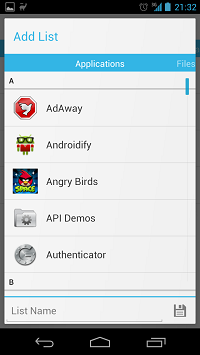
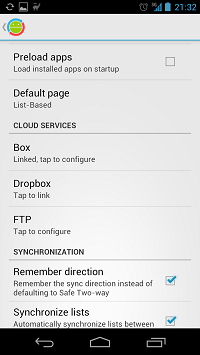

After we set up properly we need folderpair All
that's left is to leave your phone or tablet at night
to charge, or coming to work, connect it to your
computer. It is clear that we must not forget to
include wifi. This can be done manually, or you can use
tools such as Llama.

Synchronization software to connect wirelessly to
the Internet and will synchronize. The first time it
will take time, which depends on the amount of data
and bandwidth Internet access. But subsequent
synchronization in an instant. FolderSync remember
the dates of the changes in the number of files to a
folder and checksums. In general, all grown-up.
Synchronization can be started any folderpair forced
manually at any time.

In the future, your files are synchronized with the
above scheme. Getting into the cloud file is replicated to a working PC, which usually does not turn off with shatnogo client for cloud service. Then they are locally synchronized between folders, which are at different hdd with a standard and free SyncToy from Microsoft or rsync (as you like), or a similar utility. During the day, as the connection to the Internet, redundant data is replicated on a home computer and a laptop with the same native client cloud services.

The bottom line is we are physically separated and
highly available copies of data and a strong, healthy
sleep. Good luck.
FolderSync

DataSync

DataSync Beta

SyncToy

rsync backup for Android

Llama - Location Profiles


settings to update iOS 6.0.1 is here


Apple has been working for a long time, and finally
rolled out for us the first update to iOS 6. The long
wait is now ended and we all connect their devices to
a computer or use their settings to update iOS.

The first update contains a list of the eight key fixes and enhancements:

» Fixed a bug that prevented the installation of software updates via Wi-Fi for iPhone 5 » Programming error that leads to the display of horizontal lines on top of the virtual keyboard » Fixed an issue that could cause failures when using the camera flash » Increased level of reliability of the iPhone 5 and iPod touch to connect to encrypted networks, Wi-Fi WPA2 » Fixed the problem of the iPhone in mobile networks » Added option "Cellular Data" for iTunes Match » Fixed an issue with the installed password protection, which led to the granting of access to information cards Passbook a locked screen » Fixed Exchange Meeting

Users of the iPhone 5 today feel special. For their
separate devices, Apple has released a patch that
fixed a bug that prevent the installation of software
updates via Wi-Fi. Happy owners of iPhone 5 in the
basic configuration, software updates, after checking
to see through the eyes of something unusual.

Touching the icon redirects you to the basic settings,
where you can already familiar to the system start
updating your phone to the latest iOS 6.0.1.

We remind you that iOS 6.0.1 iPad supported second
and third generation, iPhone 3GS, iPhone 4, iPhone 4S,
iPhone 5 and iPod touch fourth generation.


Steam for Linux: started Closed Beta


Today is the first lucky ones to mailboxes fell invitation to the closed beta of the Steam client for Linux, which was announced in the official community:

«"The first wave of invites sent!
If you have completed a survey*, but you have not received a letter, do not despair. We will expand the beta in the future a large number of respondents.

Thank you for your support to help release Steam for
Linux, Team Valve Linux. »


(Poll - a survey conducted recently at the site Valve,
in which anyone could fill in some information about
your Linux-e and iron).

Steam came in the form of deb-package for architecture i686, which you can download at
media.steampowered.com/client/ installer/steam.deb

Steam the shop appeared search for games available for Linux, which is not so much, mostly the fact that previously sold in Humble Bundle.

Here is the official group dedicated to the discussion of beta client for Linux.

What if I do not come to invite?

Wait. And if you do not want to wait, for there
ArchLinux PKGBUILD informal, in which, among other things, including bypassing the error message pop, if you did not come to invite. The efficiency of the author notes are not tested. Users of other distributions may try to create a file/usr/bin/steam-hack, comprising:

#!/Bin/bash
xdg-open steam://open/friends/

and run with it Steam. Work is not guaranteed.


REDSN0W 0.9.15B3 WITH BUG FIXES AND SUPPORT FOR IPAD MINI AND IPAD 4


Home Improvement RedSn0w 0.9.15b3 affected
computer users Windows, who complained about the
appearance of the "error 2601" when restoring the
operating system on the iPhone, iPod touch and iPad,
as well as the "error 14" during the "suturing" files.
In addition, users iPad mini and iPad 4 can use the new
RedSn0w for saving certificates SHSH.

"Update 6 (November 5): RedSn0w 0.9.15b3 fixes" error 2601 "on Windows using the Restore button. The program also solves the problem with error 14 in iTunes. Note: if you have baseband, you do not need to resort to suturing function, you can use the native function Restore to RedSn0w. Happy owners of iPad mini and iPad 4 on Friday can use RedSn0w to save blobs 6.0 in Cydia. To do this, connect a new device to your computer, and then use the Extras-> SHSH Blobs-> New and select the firmware for iOS 6.0 ».

The developers of the iPhone Dev Team also promised
to release a compatibility update tomorrow Ultrasn0w for iOS 6. Supports the same version of the baseband, that of iOS 5.x.

Download RedSn0w 0.9.15b3 for Windows

Download RedSn0w 0.9.15b3 for Mac OS X


Sundries article Copyright © 2010 LKart Theme is Designed by Mobile